Search This Blog

Tuesday, April 26, 2016

10 Garden Books for Preschoolers

One of the obstacles to children eating whole food diets is that many live in a world where food just "appears" - and mostly in processed form. Do noodles grown on trees? Do apples come from the grocery store bin? These are the things my toddlers ask! In order to develop an early love of clean eating, children need to have tactile, sensory experiences with whole foods. I really believe this. They need to understand the gift of food - where it comes from, how it grows, and how it's prepared.

That's why I'm such a big fan of our kitchen garden. Let's not pretend we actually save any money growing our own food. (At least we don't - not after accounting for set up materials, extra seeds the twins "accidentally" sowed in their sandbox, and replacement plants for everything the birds and bunnies destroy...) Full Discloser: We are very bad gardeners. But what we do gain from gardening is invaluable, hands-on learning for our little ones.

Now not everyone has space or time for a kitchen garden, I know. We've been in that boat too. One year, instead of flowers, we put big pots of tomato plants on our tiny porch. Or it's all over Pinterest how you can regrow vegetables on your windowsill. BUT there are also books. Maybe you don't have a park nearby to travers on a "Seed Hunt". But you can read about seeds as your toddler marches his pudgy fingers across the pages, hunting for seeds in illustration form. The amazing thing about literature is that it can gift experiences to us that we would never have explored without it. AND you don't have to remember to water a literary garden! Speaking of which... (that whole thing about being bad gardeners)...

Here are ten our favorite preschool-appropriate books about gardens while I go grab the hose and hope it's not too late to save our strawberries:

Songs & Poems about Gardens


1. Jo MacDonald Had a Garden
Beautiful illustrations depict a garden through every season. Make up your own hand motions and sing along to the tune of "Old MacDonald".

2. Anna's Garden Songs
Children will benefit from the rhythm of poetry read aloud. Whimsical illustrations make this entertaining as well.


Silly Stories about Gardens


3. Frog and Toad Together: The Garden (Caldecott)
Toad wants to plant a garden and Frog gives him seeds but warns him it is hard work. This amusing tale is a good time to discuss what seeds really need in order to grow.


4. A Garden for Pig
Pig is tired of eating apples and wishes he had his own garden. Imagine his surprise when plants sprout from his droppings! Perfect for poop-obsessed toddlers. Pair with A Seed Is Sleepy.


Classic Fiction about Gardens


5. The Gardener (Newberry, Caldecott)
Maybe not a classic but the most rigid definition, but this book is certainly award and heart winning. It is told through letters. Try planting your own seeds in a garden or window pot and write a letter to someone telling them about it!


6. The Tale of Peter Rabbit 
People aren't the only ones who enjoy food from gardens! We picked this old favorite up again when rabbits starting munching away our hard work!


Informational Books about Gardens


7. From Seed to Plant
Gail Gibbons is my go-to author for elementary non-fiction. Some content may be to difficult for preschoolers but the illustrations are colorful and informative.

8. A Seed Is Sleepy
I simply cannot get over the illustrations in this text. I am in love with them. The text is divided into large print, repetitive, phrases ("A seed is...") and smaller print detailed information. Read one or both to differentiate learning.


Cross-curricular Books about Gardens


9. Planting a Rainbow (colors)
Not all gardens grow food! Learn about colors while exploring vivid illustrations of flower variety.

10. Eating the Alphabet (letters)
While not technically a book about gardens, Lois Ehlers brings her beautiful art again to list fruits and vegetables from A-Z. What letters are on your plate?

Monday, April 25, 2016

Easiest Overnight Oats & Blueberry Nice-Cream


This is my easiest overnight oats recipe and the boys love it! Just 4 ingredients pack in fiber, whole grains, protein, and calcium. Layer with fruit and/or 5 minute blueberry nice-cream and you have a beautiful breakfast to-go! The twins love to help "design" their own jars in the mornings. 


Ingredients

Oatmeal: 
1 banana
1 cups old-fashioned oats
1 cup milk of choice
2 Tbs almond butter

Nice-Cream:
1 banana
1 cup blueberries
1-4 Tbs milk of choice
1/2 cup spinach leaves (optional)
                                                                                                         

Before Bed

1. Peel and freeze 1 banana and 1 cup of blueberries.

2. In a medium bowl, mash another banana with almond (or another nut) butter. 

3. Add 1 cup oats and 1 cup milk. Stir, cover, and refrigerate.

In the Morning

1. Remove oatmeal from fridge and stir.

2. Slice frozen banana and place in blender with frozen blueberries.
NOTE: You can also add in 1/2 cup of torn spinach leaves to add a veggie!

3. Begin blending and add 1-4 Tbs milk as needed. Mixture will be grainy at first. Keep blending as it will eventually turn creamy and smooth!

4. Layer oatmeal, nice cream, and fresh fruit as desired. Breakfast in minutes!

Sunday, April 24, 2016

5 Ingredient Sweet Potato Fries & Yogurt Dipping Sauce


Some days are just crazy.

Like "why are my keys in the fridge" and "who put the firefighter helmet on the baby" CRAZY.

These are the days that I could really care less about what my kids eat so long as they are full. The days when I would really love to just throw a box of microwaveable mac-n-cheese at them and call it lunch. Please tell me I'm not the only mom who has these kind of days! And by these kind of days I kind of mean... all the time.

There. I said it. Every day is crazy at our house. Maybe it has something to do with having three kids in three years (thank you, twins). But, regardless, I have to have something quick and nutritious in my reporatoire that will not be met with a toddler eating strike if I'm going to survive this phase of parenthood. Soo...

French fries! Everyone likes french fries. Even my super-picky-I-liked-carrots-yesterday-but-not-today-todders. These are sweet potato fries (so more nutritious) and baked (so not as many fats). Did you know: a serving of sweet potatoes contain 400% of your daily Vitamin A? The yogurt dipping sauce is also a better alternative to traditional fry condiments. It has the sweetness of ketchup and the creaminess of mayo without the same fat content and refined sugars. When in doubt, my twins will usually eat sweeter foods over savory ones. Plus, in my experience, toddlers will eat anything that has a dipping sauce! 

5 Ingredient Sweet Potato Fries & Yogurt Dipping Sauce

1 sweet potato
1/4 cup plain yogurt*
1 tsp maple syrup
1/4 tsp cinnamon
salt

**optional olive oil**

1. Preheat oven to 450 degrees.

2. Peel and slice your sweet potato into fries. Keep baking time in mind when you decide the size. Thinner fries will bake up quicker than thick ones. You can also do this the night before, but you will want to toss with a drizzle of oil before sealing and refrigerating them if so.

3. Line cookie sheet with parchment paper and spread out fries on it. You can choose to bake plain or drizzle with oil (about 2 tsps) for a crispier texture. I always opt to bake with olive oil because a) I prefer the texture, b) kids especially need good fats, and c) there's some research that beta carotene (Vitamin A) is absorbed better when eaten with fat.

4. Bake for 15 minutes and then check. The thinner the fry, the faster the cook time.

5. Meanwhile, mix yogurt with maple syrup, cinnamon, and a pinch of salt. (If your yogurt is sweetened, omit the maple syrup).

6. Remove fries from oven, sprinkle with salt, and cool. Enjoy!

*Greek yogurt has a nice texture for dipping. Coconut yogurt has a good flavor as well if you are going paleo/vegan. Shy away from soy-based yogurts as they have too strong a flavor to work well here. 


10 Ways to Use an Outdoor Numberline


So I know I usually post about food, but this week's weather has been so divine that I have been more occupied with teaching toddlers than feeding them! We have planted seeds, read books about gardening from the local library, and charted our 5 senses on a graphic organizer. It's amazing how observant children are of the world around them if we'd only pause to ask what they see, smell, hear, and feel! After turning our kitchen garden into a "search and rescue" site for his cars, O dictated:

I smell dirt.

Isn't that one of the best scents of spring?! Fresh earth, worked with a trowel. Fragrant. What was old and decayed all winter now teeming with nutrients to birth new life! But I digress.

When we use the great outdoors for our classroom, I find it natural to incorporate science, reading, language, and even social studies concepts into our experience. But -not innately being a "math person"- I have to draw deep on my teaching training to invent ways play at math outside. This week we built a very simple outdoor number line! Far too often, children find math boring because it is confined to pencil and paper. In my experience with early education students, math should be kinesthetic! Math should be tactile and concrete for the best results.

So, first things first, how do you build an outdoor number line? Here are several easy and inexpensive ways:


1. Start at zero. Ok. So not technically a "way" (that's coming) to make a number line. But it's a very important tip! When I taught first grade, one of the most common errors students made while using a number line was to start at 1 instead of 0 when counting, leading to all their answers being off by a single digit. Make sure your number line starts at zero. The concept of "something" (a numeral) representing "nothing" can be a surprisingly challenging concept for toddlers especially. Try numbering paper cups or little buckets 0-10 to use as your number line. Then either fill them yourself or give your child objects such as craft sticks or rocks to fill each one with the correct amount. This will help him visualize "zero".
2. Use chalk. Don't have a yard? No problem! Just draw a quick number line on your driveway or sidewalk.
3. Line up paper plates. If you want something very inexpensive but that can be set up and cleaned faster than drawing and washing chalk, try a paper plate number line. Be sure to purchase a heavy duty "cardboard" textured plates if you want them to stand up to multiple uses. Simple write the numbers on them with markers, set them out, and get started.
4. Invest in paving stones. Build a more permanent fixture in your yard using stone pavers or tiles. You can paint the numbers on, or draw with chalk if you'd like the pavers to have dual decorative and utilitarian purpose.
5. Repurpose a clothesline. Use a clothesline (or string) and clothes pins to create a sorting number line that children can build and rebuild. You can be fancy and laminate decorative numbers to clip along the line, or you can just write 0-10 on index cards and call it a day! See The Preschool Toolbox for ideas.

Now that you've built your number line, how do you use it? Here's the fun part :)


  1. Free play. Unstructured play is one of the most important learning activities a young child can engage in. Simple set up an inviting outdoor number line and sit back to see if and how your child will use it. There is no "wrong way" here. 
  2. Counting. Practice counting from 1-10 aloud while hoping along the number line. If this seems boring, try:
    1. Stomping like a dinosaur
    2. Tiptoeing like a mouse
    3. Hopping on one foot like a flamingo
  3. Counting backwards. It's not just for rocket ships blasting off. Counting backwards is an important foundation for subtraction.
  4. Skip counting. Use giant kangaroo jumps to practice skip counting. With a number line I would just model counting by two's (landing on every other number). 
  5. Odd and Even. While skip counting, take the opportunity to discuss odd and even numbers.
    1. Zero, two, four, six, eight. Johnny's jumping's really great!
    2. One, three, five, seven, nine. Jimmy's hopping in a line!
  6. Sequence/sorting. This works best if you are using paper plates or a clothesline and pins to create your number line. Give your child the numbers 0-10 (or 0-5 for an easier modification) and have them sort them sequentially to build the number line on their own. 
  7. Missing number. This is another sequence activity. The numbers are playing hide and seek! While your child covers their eyes (and counts to 10 ;) ) remove/cover one of the numbers on the number line (leaving its "spot" open) and ask your child to discover which number is missing.
  8. Addition.  Here are a few models of how I would phrase addition problems on a life-sized number line:
    1. Equation: 2 + 2 = 4 (can verbalize and/or write with chalk)
    2. Model: Hmmm... Two plus two. I want to know what two hops and two more hops is. Here is the two. What is two more? Let me take two more hops. One. Two. Oh look! I am standing on the the number four! Two and two (more) is four. Two plus two equals four!
    3. Acting out: Adam, can you use the number line to find out what 2 hops plus 2 more hops is? Etc.
    4. Story problems: Jeff the Giraffe took 2 wobbly giraffe steps. Then he decided to take two more wobbly giraffe steps. How many steps did Jeff take?
  9. Subtraction. See addition.
  10. Writing. Take this opportunity to practice writing the numerals.
    1. Hard: Write or paint (depending on the style of number line you use) the actual numbers for the line.
    2. Moderate: Trace the prewritten numbers on the number line with chalk.
    3. Easy: Explore one number by tracing its shape with pebbles or other small objects.


Thursday, April 21, 2016

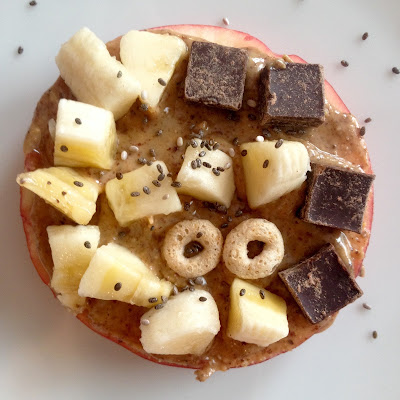
Apple Pizzas

Apple pizzas are a fun hands-on snack for little chefs and they are totally toddler-approved. As a retired early education teacher, I also love the fine motor skills involved here for all the busy little fingers!

This is an extremely simple "recipe", but it is versatile and easy to whip up on a busy day. A deeply ingrained love of clean-eating starts in childhood; so tactile exploration of whole foods is very important for the toddler years.


Apple Pizzas

1. Have an adult slice an apple through the midsection to create circular disks. This is a great time to point out the star in the center of the apple, the seeds, and even to discuss plant life cycles if you're feel ambitious.

2. Supply almond (or another nut) butter, plastic knives, and a variety of "pizza toppings" for decorating. 

3. Show child(ren) how to spread the nut butter "sauce" on their apple crust and then either (a) discuss and model patterns (raisin, banana, raisin, banana, etc) and have them create their own, or (b) let them go free-for-all decorating on their own.


Ingredients:

Large organic* apple
Natural nut butter of choice

Topping Ideas:
raisins
craisins
dark chocolate chips
chia seeds
cheerios
diced banana
sunflower seeds
pepitas
cinnamon

*We can't always afford organic produce, but apples are a great fruit to buy organic when you can as they are on the "Dirty Dozen" list of produce with the highest levels of chemicals. See the entire Dirty Dozen and Clean Fifteen 2016 list here.


Baked Oatmeal: "Polynesian Wedding Cake" Style


Baked oatmeal is a lovely dish because it is a blank canvas that can support so many different flavor combinations! It also makes a wonderful brunch dish, in my opinion, because of its heartiness and ability to be completely prepped the night before.


Baked Oatmeal: "Polynesian Wedding Cake" Style

1 cup old fashioned oats
1 tsp cinnamon
1/2 tsp ginger powder
1/4 tsp salt
2 Tbs chia seeds

2 cups coconut (or other plant-based) milk
1/2 cup orange juice
1 Tbs maple syrup
1 tsp vanilla extract

1 cup shredded carrots
1 cup diced pineapple
1/2 cup diced mango
1/2 mashed banana (about 1/4 cup)
2 Tbs chopped nuts
2 Tbs raisins

Coconut flakes for topping

Steam carrots with a little water in a medium saucepan until soft. (The bake time later will not be long enough to cook them otherwise.) Drain.

Back in the saucepan, combine carrots with chia, oats, and spices and stir. Add liquid ingredients and stir well to combine. Measure in fruit and nuts and then cook over medium heat, stirring frequently until thickened. (About 10 minutes).

Pour into a standard pie dish and either
1. Cover and refrigerate to bake in the morning, or
2. Preheat oven to 350 degree and bake for 20 minutes. 

If you refrigerate, you will need to set oatmeal out in the morning to come to room temperature or bake it an extra 10 minutes.

Top oatmeal with coconut flakes and broil, if desired, on low for 2 minutes to toast.
My toddlers do NOT like the coconut. It has the utter audacity to be cwunchy.


My Favorite Soup from My Favorite Food Blog


Back when my husband and I first started our journey to cleaner eating, we had no idea were to start! Initially, we started by thumbing through some Abs Diet books he had sitting on the bookshelf. (Of note: neither of had or currently has abs!) This was a decent warmup as we learned about superfoods, protein sources, and alternatives to sweeteners. Eat This Not That was my personal favorite because if you're still going to binge on ice cream from time to time, knowledge is power! Knowing what brands did the least amount of damage to our bodies when we succumbed to the siren call of junk food was supremely helpful!

But we still had a long way to go. 

The abs diet incorporated a large amount of meat in its repertoire. And, though we gradually toned down our meat consumption as a natural result of boosting the amount of produce and plant-based foods we were eating, we were still frequently enjoying red meat, sausage, etc. Then the study came out from the World Heath Organization which concluded what we were already beginning to suspect - that processed meat (sausage, bacon, lunchmeat..) is carcinogenic to humans and that red meat is a probable carcinogen as well. That was the kick in the pants we needed to truly start delving into some vegan and vegetarian recipes that were nutrient dense and caloric enough to support our active family lifestyle. 

 Oh She Glows Cookbook


Enter Angela Liddon's easy to follow and simple ingredient recipes on her blog Oh She Glows! (And, no, I'm not paid to promote her! We just love her food!) My husband actually found her site while researching one night. Unlike many other vegan bloggers, her recipes are high in fat and very filling - a must when you're also feeding tiny people with monstrous toddler metabolisms!

While we still eat fish and organic, free-range chicken once a week, many of the dishes we rotate through our monthly meal plans are vegan and come from her blog. Below is the link to my absolute favorite soup of hers, rich with Indian flavors!


Glowing Spiced Lentil Soup


I make this with her Cilantro Speckled Basmati (substituting brown rice for the basmati) and I add 1/2 a cup of carrots to round out the soup!

NOTE: If our toddlers aren't eating with us, by chance, I will also substitute 1 can of rotel for the can of tomatoes to bring on heat I associate with curry!

Wednesday, April 20, 2016

Blended Strawberry Basil Ice

It's strawberry season in our neck of the woods! My husband and I had this drink first while strolling around our historic downtown area on a date night. We had purchased from a little shop... and paid almost seven dollars for it. 


I was hooked from the first cool, refreshing sip. The sweetness of the berries and brightness of the lemon exude springtime. The basil (which is in the mint family) is complimentary but somewhat unexpected, adding a certain refinement to what would otherwise be a simple strawberry lemonade...  But seven dollars?? Seven dollars buys 21 diapers. Seven dollars buys ingredients for an entire family dinner. Seven dollars also buys 60 miles of gas for park trips during this beautiful weather. Seven dollars? NOPE! Not happening.

However, at home I had baskets of farm fresh berries we had just picked from the local strawberry patch and one giant basil plant bush taking over my kitchen garden. So I thought: "I have the main ingredients. Surely I can experiment and make this for less than seven dollars!" Here is the result! It's very much like the original and a huge hit for after mowing our lawn. Or for just lounging on patio soaking up some sun (and making sure the twins don't gouge each other's eyes out with sandbox tools.) In fact, it's such a favorite with adults that we now serve this blended ice whenever we have guests over in the spring or summer!

2 Tbs fresh lemon juice
2 Tbs honey
8 basil leaves
8 frozen strawberries
8 ice cubes
1 - 1 1/2 c water

Peaches 'n' Cream Blackberry Cobbler Oats

Ever since we discovered that you can blend spinach into milk for overnight oats and not taste the difference, we have been all about "Emerald Oats" (as my husband coined them) around the DeMarco house! The magic ratio is:

1/2 cup packed spinach per 1 cup plant milk


So that said, even though the color of this insta-breakfast is green the flavor is that of a pleasantly toned-down cobbler. I grew up a Georgia girl so peaches were always ripe and succulent in the summer, tempting us in little farmer's stands along the back country roads. And then blackberries. Well, blackberries grew wild everywhere. Safe to say, I enjoyed my fair share of peach-blackberry pie with a brown sugar and oat streusel on top. It seemed the natural route to go with oatmeal as well!

3 packed cups spinach
3 cups old fashioned oats
2 cups walnut (or other) milk
2 cups peach juice (or water but up the syrup)
6 Tbs chia seeds
3 Tbs (or to taste) maple syrup
2 tsp vanilla extract
1/2 tsp ginger
1/2 tsp cinnamon
2 peaches, diced
1 cup black berries, halved

serves 5-6

1. Blend spinach in milk for 3 minutes on high.
2. combine all ingredients, cover, and set in fridge overnight.
3. For toppings you can go healthy and add buckwheat crips for texture ... or you can lean towards sweeter and top with a granola "streusel". A dollop of coconut whip cream wouldn't be a bad idea either!

Friday, April 15, 2016

Black Beans and Rice with Mango-Peach Salsa

This is one of my favorite meals based on a Caribbean entree from Savannah's Toucan Cafe. 

Growing up with my best friends just outside of Savannah, Georgia was it’s own mini-culinary adventure. Savannah is full of unique eateries and samplings of treats from many places around the world. Toucan Café happened to be our own special spot for girls’ nights. This dish is based around a meal I had there back in 2004 – right before my friends dragged me to prom where I had my first (and accidental) dance with some guy named “Michael” who I would later meet again seven years later and marry.


BEANS:
1 onion, diced
1 yellow pepper, diced
3 stalks celery, chopped
2 cloves garlic, minced
1 tsp salt
2 T (white or rice) vinegar
2 tsp cumin
1 tsp chili
1 tsp garlic
1 tsp salt
1 tomato, diced
1 c carrots, chopped or julienned
1/2 bunch cilantro, chopped
2 cans black beans, drained and rinsed
3 bay leaves
1 c broth

SALSA:
1 mango
1 peach
1 dozen grape tomatoes
1/2 cucumber
1/2 avocado
1/2 bunch cilantro

DRESSING:
Tbs lime juice
1 Tbs maple syrup (vegan) or honey 
1/4 tsp salt

1.     Sweat the first four aromatics with the teaspoon of salt, adding garlic last to avoid burning.
2.     Once onions and celery are translucent, add the remaining ingredients in order, stirring frequently.
3.     Simmer covered for about 20 mins.
4.      While beans are cooking, chop the fruits and vegetables for the salsa and fill a small serving bowl.
5.     Whisk together lime juice, honey/syrup, and salt and pour over the salsa and toss.
6.     Serve beans over Spanish rice and top with fresh salsa.

7.     HINT: For easy but fragrant Spanish rice, replace water with chicken or vegetable stock and add 1 tsp each of chili, cumin, garlic, onion, & paprika powders for every cup of brown rice.

Wednesday, April 13, 2016

Superhero Fuel

Today E tried his hand at naming a smoothie! I asked him what he thought our almond butter and jelly smoothie tasted like. He leaned back his head and closed his eyes for another gulp. He thoughtfully licked his lips. He cocked his head slowly to the side and said: "A superhero". And that's how Superhero Fuel got its moniker!


This is our classic nut-butter and jelly smoothie with a few modifications to boost the protein up to about 9 grams per serving. Little boys superheroes are constantly busy running around the yard when duty calls - today they "rescued" an earthworm in distress - and so the extra protein boost does their growing muscles good!


Unfortunately, this smoothie requires a little prep-ahead, but it's not too bad. Prep can be done the night before or, at a minimum, 1 hour before serving.

Superhero Fuel

1/4 cup old fashioned oats
2 Tbs buckwheat seeds
1 Tbs chia seeds
1 1/2 cups almond or walnut milk
1 frozen banana
2 Tbs almond butter
1 Tbs almond flour
1 cup frozen berries (or cherries work well too!)

1. At least one hour before serving, Pour oats, buckwheat, chia seeds, and milk into the blender and place in the fridge. Break the banana into chunks and put it in the freezer.

2. Add frozen (or cold) banana to the blender along with the rest of the ingredients. Blend on high about 3 minutes or until smooth.

Monday, April 11, 2016

Key Lime Easy Oats (with shh! spinach)

Today is the much anticipated LIBRAY DAY at our little house. The boys are eagerly gathering up our pile of books as I type, so this post will be short and sweet. We eat overnight oats at least four breakfasts a week, so I've been looking for a way to sneak in vegetables without ruining the flavor (or  the toddler enthusiasm). I finally found it! And - just because I hardly believe it myself - here they are. Eating spinach for breakfast.


After weeks of brainstorming, I finally got smart and took a hint from smoothie successes. The key to this recipe resides in these three little tips that I've shared before.

  • Color Match - if the oatmeal is going to be green, I'd better have a darn good excuse. Flavoring the oats with lime juice and zest gives a plausible (if you're three-years-old) reasons for them to be green.
  • Add Acid - again, the lime comes in handy. Citrus is adept at masking any subtle earthy flavor from greens. 
  • Blend, Baby, Blend - hell hath no fury like a toddler who just detected a noticeable piece of spinach in their "sweet" breakfast (or smoothie). Run the blender on high for at least three minutes.
Without further ado - the recipe:


Key Lime Easy Oats (with shhh! spinach)

4 cups spinach
3 1/2 cups almond milk
3 cups old fashioned oats
1/4 cup vanilla protein powder (optional)*
Zest of 1 lime
3 Tbs lime juice (optional)**
3 Tbs chia seeds
3 Tbs maple syrup (or other sweetener)
Fruit for topping (pineapple, strawberries, and mango all go well)
Toasted coconut (optional)
Extra maple syrup for drizzling


1. In a blender, combine milk and spinach on high until spinach is not visible to the discerning child's eye.

2. Combine with all the other ingredients except toppings. Cover and refridergate overnight.

3. In the morning, portion oats out and layer or top with fruit of choice. Add a sprinkle of unsweetened coconut and drizzle of maple syrup if desired. Enjoy!

Serves 6

*If the idea of tart oats bothers you, I tasted the oatmeal after adding just the lime zest alone and was pleased. My kids have always like sour things though and enjoyed the added lime juice.
**We use a protein powder sweetened with stevia. If omitting, decrease liquid by 1/4 cup and add 1 tsp vanilla and 1-2 Tbs sweetener of choice. 


The "Naughty Monkey" Smoothie

Around our house, smoothies are part of the daily routine. Around 3 o'clock every afternoon, the kids come wandering into the kitchen passionately declaring how hungry they are and looking to see what's going into the blender this time.

Seriously, my kids eat like hobbits. So after serving breakfast, baby breakfast, mid-morning snack, brunch, lunch for the baby, lunch part II, and  with dinner looming just around the corner, I've had it up to my ears with making people plates and wiping the table after them. Enter the:

Here-Kid-Drink-This-Concotion-In-A-Cup-And-It-Better-Fill-You-Up-Smoothie

But seriously, the smoothie is the perfect vehicle for cramming extra nutrients and calories into perpetually "starving" toddlers with little to no mess and in little to no time. They're even portable for those ambitious days I try to accomplish All-The-Errands in the meager two hours between baby's nap and dinner.

Normally, I give our smoothies cool names like "Green Monster Truck" or "Carrot Crusher" to try to get our three-year-olds to drink them with gusto. But it didn't dawn on me until today that I should try letting them name the drinks. I guess sometimes I get a little caught up in "running the house" and slip into "running the show" instead. It's my loss. It turns out, toddlers are pretty awesome at naming things.


Today I was dreaming of chocolate covered cherries while dumping frozen fruit and cocoa in the blender and admiring the pretty fuchsia color it was making. Of course the minions came running as soon as they heard the tell-tale "whir" start up. "What you makin', Mommy. I'm darrrrrving." E even fell on the floor in mock weakness to emphasize the point. "Well, I've got bananas, cherries, chocolate..." (Eruption of little boy giggles.) "I want to call dat a Naughty Monkey!"O announced.


And so the Naught Monkey (Cherry Garcia) Smoothie was born! And, my, is it good! O kind of has a point with the "naughty" part because there are no veggies in this sweet treat. But (and that's a big but), it IS worlds healthier than the doughnuts I actually was craving this afternoon. Here are the ingredients! Simply blend until smooth. Maybe one day I will update this with a little beet juice or a purple carrot to nutrient-it-up a little. Maybe. Probably not :)

Naughty Monkey Smoothie

1 frozen banana
1 1/2 cups frozen cherries
1 cup almond milk
3 Tbs vanilla protein powder*
1 1/2 Tbs cocoa powder
1 Tbs plain almond butter

*Our protein powder is sweetened a little with stevia so -if omitting- you may want to add a dash of your own sweetener to get the full dessert-like effect.

Thursday, April 7, 2016

Pineapple - Almond Thai Noodle Bowl

As the weather gets nicer and the children and I spend more time outdoors, I start to lose track of time in the afternoons. (Darn you, Daylight Savings.) My internal clock is thrown off by the lingering sunshine and -more often than not- I find myself glancing at the clock in panic realizing that the witching hour is nearly upon us and dinner isn't even started. For those of you who are unaware -

Witching Hour: (n) 1. An unspecified hour in the late afternoon when every child in the universe decides they are instantaneously hungry, not hungry, tired, not tired, annoyed, incontinent, going to play with all their toys and unbearably bored ... and announce it in no uncertain terms. (2) The same time your spouse usually walks in the door also tired and hungry.

^^This is why I need a plan for a well-balanced dinner can be thrown together in a heartbeat. Crockpot meals are a fantastic solution to the "no time to make dinner" problem, but after a while we start to get tired of the slow cooker texture and long for the more al dente CRUNCH of meal based on fresh produce. Enter the ever-versatile Noodle Bowl! The issues with the traditional stir-fry dinners I grew up on were that they a) required a protein to be prepared and properly cooked, and b) often had us standing around ravenously waiting for the rice to finally finish cooking.


Side Rant - Have you ever cleaned up rice of the table floor, chairs, windowsills, and blinds after two toddlers made a meal of it? No. Thank. You. 

Solution A) An all veggie stir-fry enhanced by a protein-rich nut butter sauce
Solution B) Brown rice noodles, which can be cooked in 3-5 minutes, to replace regular brown rice.

And that is how the Pineapple-Almond Thai Noodle Bowl was born.

Step 1: Start your vegetables of choice in a pan on medium heat with a drizzle of olive, coconut, or sesame oil. You can prep veggies in the morning or even buy pre-cut vegetables to keep thinks extra simple. Stir-fry until al dente*. I use:
  • 2 small heads of broccoli
  • 2 good handfuls of shredded carrots (about 2 cups)
  • 2 good handfuls of snow peas (about 4 oz)
*TIP: I set aside a few vegetables to steam instead of saute. This goes over much better with the twins who are still cutting back molars.


Step 2: While vegetables are sautéing, chop cilantro for garnish and put sauce ingredients in the blender and puree until smooth. This makes about 2 generous cups of sauce.

  • 1 cup frozen pineapple chunks
  • 1/2 cup coconut flakes
  • 1/2 cup natural almond butter (no salt or sugar added)
  • 1/4 cup tamari
  • 2 Tbs rice vinegar
  • 2 Tbs water
  • 1 tsp ginger powder
  • 2 cloves of garlic, minced

Step 3: After sauce is pureed, set aside and bowl about 6 cups of water. (I use an electric water kettle to speed the process). Pour over oz of brown rice noodles. We love Annie Chun's brand. Allow noodles to rest 2-5 minutes and then strain. Quickly hand toss with a little oil. Rice noodles clump together quickly!

Step 4: Assemble bowls with noodles, vegetables, and sauce.* Garnish with cilantro if desired! Enjoy :)

TIP: You can toss everything together at once, but I have found it does not keep and reheat well this way. The noodles get very "globby" in the refrigerator when coated with the sauce.

Wednesday, April 6, 2016

Simple Summer Salad with Maple-Mustard Vinaigrette

The thermometer may have maxed out at 50 degrees yesterday, but the cool weather hasn't stopped me (if you read my latest post) from longing for summer. Right now, I'd give anything to trade our blustery spring week for a few days like these:


However, while I may not be able to conjure up warmer days for my family, I can create a little sunshine in the kitchen at least!

Last night's dinner was Portobello Steak Fajitas from The Oh She Glows Cookbook - brightly marinated mushroom slices with all our favorite fajita toppings! I substituted a 1/8 tsp chipotle chili powder for the 3/4 tsp of regular chili powder. It brought up the heat just enough to please the adults (although the tiny food critics made it known that they preferred the original version).


We served the vegan fajitas with a large side of my mom's Simple Summer Salad dressed with Maple-Mustard Vinaigrette. I adored this salad growing up. It's like July in a bowl :) And the great thing is that it's totally versatile. Yesterday's version was true to my mom's recipe: 

  • 1/2 English cucumber, diced
  • corn off 2 ears*
  • 1/4 cup cilantro, packed
  •  and about a dozen grape tomatoes, sliced

But I've been known to toss in diced bell pepper, jalepenos, black beans, avocado, and even mango! Top salad with a good sprinkle of freshly ground black pepper.

*Note: You can cook corn in the microwave in a pinch. Microwave still in the husks, 3 minutes per ear.

The Maple-Mustard Vinaigrette is just a simple!

  • 1 oz apple cider vinegar (Bragg's is our favorite!)
  • 1/2 oz olive oil
  • 1/2 oz maple syrup
  • 1/2 tsp mustard
  • a good pinch of salt

Happy Summer (if only in your kitchen)!


Monday, April 4, 2016

A Lighter New England Dinner

Spring has finally blown into Middle Tennessee. The grass is finally green with the little, golden dandelions blooms in droves mimicking the warm, round sun above. The sunshine is toasty but the constant breeze is still brisk which has a way of reminding me of all the late summers I spent on the coast of New England as a child. It's bare feet and fleece weather. Dinner on the deck weather. Reminiscing weather.

Nantucket Harbor as seen from Henry Street Beach
If I lean back in my adirondack chair and close my eyes, listening to the tolling of our buoy bell, I can almost imagine myself back on the patio in Kennebunkport, Maine or sunbathing in the dingy on Nantucket Harbor. I hope our family will get to visit again this year. I would love hear the pitter-patter of my own children's  feet on Henry Street Beach where I learned to walk; or listen to the kerplink, kerplank, kerplunk of their little beach treasures being tossed into the tide pools on Timber Island. Perhaps we can visit this year. Perhaps not. A twenty-two hour drive with three small children is daunting.


Cape Porpoise, Main
But all this weather and remembering makes me impatient for one one of the best parts of New England - the food! Whether it's a clambake when winds off the sea call for sweaters zipped all the way up, fried haddock and chips on the unassuming Cape Porpoise pier, or Steamboat Clam Chowder during a blustery crossing of the Nantucket Sound - nothing says "New England Dinner" to me like seafood and potatoes! Full disclosure, I could inhale an embarrassing number of fried fish and potato baskets right now. It's my dream to move back to the coast, where I would single-handedly keep a local clam shack in business. But... healthy choices. Fried fish. Healthy choices. Fried fish... Okay. Let's just settle for better choices on a day like today.


The breaded and baked fish below is every ounce as good as the fried fillets I've had on vacation! I chose cod because it's a classic New England staple. But also because it is extremely mild in flavor (appealing to the twin toddlers) and it's one of the few things I can find fresh this far inland. If you wanted to go paleo or even lighter, you could just bake with salt, pepper, and a drizzle of olive oil. Or you could experiment with breading the cod in almond flour. (I've coated baked chicken successfully this way, but never tried fish). But as I said, today is a day for just making healthier choices! I'm on imaginary vacation :)

1/2 cup (or more as needed) whole wheat flour

1 egg (or just egg white) beaten

1 cup (or more as needed) seasoned panko*

1 lbs fresh cod fillets**
olive oil

Preheat over to 450 degrees. Bread whole fillets of cod by dipping first in the flour, then the egg wash, and lastly in the panko. Set on a parchment paper lined cookie sheet and drizzle with olive oil. Bake for 25 minutes.

NOTES:

*I use an Italian panko mix because the seasonings agree with my little guys. If you aren't adverse to a little heat, though, try a lemon pepper seasoned panko. It's delicious! Or bread with almond flour. Or omit breading entirely and squeeze a little lemon juice over fish before serving.

**You can also cut cod fillets into 1x2 inch strips (use kitchen shears) and bread to make fish sticks. It's more work, but I do it on occasion for the twins.

Stuck on my "fish and chips" craving, I served the baked cod with a vegan potato and asparagus salad from The Oh She Glows Cookbook minus the green onions. It's an amazing version of the original comfort food that replaces mayo with avocado. I highly recommend you purchase her cookbook. There are, however, similar versions available from other food bloggers online. They just don't beat the authentic simplicity of Angela's.


Overall, dinner was a huge success! Adults and toddler alike cleaned their plates in record time. It did not, though, cure my hankering for some sand between my toes. Looks like I need to start researching some toddler-approved healthy snacks for our next road trip!


Sunday, April 3, 2016

Night Owl Chocolate Chia Pudding

This is my simple take on a healthy chocolate pudding. I have had some amazing, chocolatey vegan puddings since I started our family's health journey. Angela Liddon and Dreena Burton share decadent versions (with avocado, nut butter, and other rich and creamy ingredients) on their blogs that I highly recommend trying your hand at. They are to die for.

Unfortunately for me, it's not until the littles are squared away in their beds, the lights are dimmed down, and the kitchen has been cleaned that I start jonesing for dessert. Oh cruel fate! Why is it that the best chocolate puddings require a food processor or a blender? Have you ever run a blender at 11pm? Spoiler Alert: blenders wake children.

Oh purest chocolate craving, why art thou so untrue? Do not make me choose 'tween your fair comfort and the sorrow of rising my children from sweetest slumber.


So here is my less-creamy, but SILENT night owl chocolate pudding solution! Bonus: it can be made in 1 bowl in under 10 minutes. Perfect for occasional habitual the late night snacker. The flavor is reminiscent of chocolate frosting to me -which I could unapologetically eat out of the can with a spoon if tempted. (Note: I did try asking my husband - our resident food critic - his opinion on this dessert, but his pudding was gone before he could mumble: "Hmmm?" in response.)

1 banana, cut in half
1 cup coconut milk*
3 Tbs chia seeds
1 Tbs vanilla protein powder (optional)**
4 tsp cocoa powder
1 1/2 tsp maple syrup
pinch of salt
pinch of cinnamon 
raspberries and/or toasted coconut for topping


In the bottom of a bowl, mash half a ripe banana. This will add thickness and sweetness to the pudding. Add the rest of the ingredients (except fruit and coconut) and stir well. The pudding will set in about 5-10 minutes. Slice the rest of the banana, rinse raspberries, and toast coconut very briefly while waiting. (A cookie sheet and oven broiler set to low will work well - but watch carefully! Coconut flakes go from toasted to burnt in lightening speed!) Once the pudding sets, top or layer it with fruit and coconut.

Enjoy! On your own. In the quiet. Without children.

(Although my kids would totally eat this).

NOTES: 

*I use canned coconut milk for the added creaminess. Because canned coconut milk tends to separate on the shelf, if I don't shake the can too much while opening the lid I can usually pour the needed cup off the top where it is creamiest for a thicker, richer consistency. 

**We use a vegan vanilla protein powder at our house that is sweetened with stevia, so this ingredient adds a dessert quality to the pudding. If you skip the protein powder, add 1/2 tsp vanilla extract and an additional 1 1/2 tsp maple syrup.